|
The following CBME core competencies are covered in this chapter.
|
Clinical Examination of an ENT Patient
Essentials Before Starting the ENT Examination
What Preparations Do You Need? You should examine a quiet room with proper illumination. Therefore, check the availability of all relevant equipment beforehand. Sterilise all instruments that enter the nasal or oral cavity. Children must always accompany their parents. For a female patient, examine her in the presence of a female relative or a female staff member. Before starting, explain the procedure to the patient and obtain verbal consent.
What Does the General Physical Examination Include? First, assess the patient’s general state of nourishment and body build. Next, check the level of consciousness and orientation to time, place, and person. Look for signs of pallor, icterus, cyanosis, clubbing, pedal oedema, and generalised lymphadenopathy. Measure the jugular venous pressure (JVP), then check the pulse for rate, rhythm, and volume. Finally, record the blood pressure.
Essential ENT Examination Equipment
Which Instruments Should You Have Ready?
- Bull’s eye lamp with head mirror: The bull’s eye lamp provides a powerful 100‑watt milky white light. This light passes through a biconvex lens and then falls onto the head mirror that you wear. The head mirror is a concave mirror with a focal length of 25 cm, a diameter of 9 cm, and a central hole of 2 cm. This combined setup gives you excellent illumination, preserves binocular vision, and keeps both hands free for examination.
- Headlight: Alternatively, you can use a battery‑operated or mains‑powered headlight. It provides excellent illumination without requiring a separate lamp.
- Otoscope: This battery‑operated instrument provides both illumination and 2–3 times magnification. It comes with a set of speculums of various sizes. You should use the largest speculum that comfortably fits the external auditory canal. Some otoscopes have an attachment for a rubber bulb, which allows you to perform pneumatic otoscopy.
- Operating microscope or otoendoscope: These instruments confirm otoscopy findings, especially before any operative procedure. You can also connect them to a monitor display for better visualisation.
- Set of aural speculums: These come in various sizes. Always use the largest size that fits comfortably into the patient’s external auditory canal.
- Tuning forks: Use frequencies of 256 Hz, 512 Hz, and 1024 Hz for performing tuning fork tests.
- Siegle’s pneumatic speculum: This instrument provides magnified examination of the tympanic membrane. Additionally, you can use it to check tympanic membrane mobility, perform the fistula test, and insufflate powdered medicines.
- Jobson Horne’s probe: This probe has two ends. One end holds cotton, and the other end has a hook or a circular ring. Therefore, you can use it to clean the external auditory canal and remove foreign bodies.
- Crocodile forceps: This micro‑ear instrument helps you remove small foreign bodies or wax from the external auditory canal.
- Hartman’s forceps: Use this instrument to pack the ear canal.
- Tiley’s forceps: Use this instrument to pack the nasal cavity.
- Posterior rhinoscopy mirror: This mirror allows you to perform posterior rhinoscopy.
- Laryngeal mirror: You use this mirror to examine the larynx and hypopharynx. It comes in various sizes (No. 4 to 6).
- Tongue depressor: You use this to examine the oral cavity, oropharynx, and nasopharynx (during posterior rhinoscopy).
- Nasal speculum: This instrument helps you perform anterior rhinoscopy.
- Spirit lamp: Use it to warm the mirror side of the laryngeal and posterior rhinoscopy mirrors. Always check the mirror on the back of your hand before introducing it into the patient’s mouth to avoid burning the mucosa.
- Suction machine: Keep this ready for clearing secretions.
- General supplies: Keep gloves, cotton, 10% and 4% lignocaine, and 25% and 50% trichloroacetic acid (TCA) readily available.
How Do You Set Up the Bull’s Eye Lamp?
Place the bull’s eye lamp over the patient’s left shoulder. Adjust its height according to the patient’s and your own comfort. Wear the head mirror so that the central hole lies directly over your right eye. This position preserves binocular vision and, therefore, maintains depth perception. Adjust the head mirror to focus the light onto the part you wish to examine. Move your head until the light focuses sharply at a distance of 25 cm from the area being examined.
How Do You Perform Otoscopy Correctly?
Hold the otoscope like a pen from its proximal end. Use the same hand as the ear you are examining, meaning your right hand examines the patient’s right ear. Select the largest speculum that fits comfortably into the external auditory canal. With your other hand, pull the pinna gently outwards and backwards. Then, introduce the otoscope into the canal until you cannot advance it further without causing discomfort. If the patient has otitis externa, however, you may need to use a smaller speculum to minimise pain.
Ear Examination
How Do You Examine the Pinna, Preauricular, and Postauricular Region?
Examine both ears systematically. Examine the symptomatic ear first; if both ears are affected, either ear can go first.
- Deformities: Look for cauliflower ear (wrestler’s ear), which results from a resolved haematoma. Also look for auricular appendages, macrotia, microtia, or anotia.
- Position: Low‑set ears are associated with congenital abnormalities such as Potter syndrome and Noonan syndrome.
- Shape: Bat ear results from an underdeveloped antihelix. Darwin’s tubercle is a normal variant.
- Scars: Look for a Lempert’s II incision in the incisura terminalis, preauricular surgery scars, or parotid surgery scars (modified Blair’s incision).
- Sinus and fistula: Look for a preauricular sinus, postaural fistula, or collaural fistula.
- Swelling: Swelling may result from perichondritis, haematoma, preauricular abscess, or pseudocyst of the pinna.
- Vesicles: Vesicles over the pinna suggest Ramsay Hunt syndrome (herpes zoster oticus).
- Retroauricular groove: Obliteration of this groove indicates acute mastoiditis.
- Tragal tenderness: Tragal tenderness suggests otitis externa.
- Mastoid surface: The mastoid process is normally irregular; however, it appears “ironed out” in the presence of a subperiosteal abscess.
- Mastoid tenderness test (three‑point finger test): Apply pressure with your first finger over the cymba concha (overlying MacEwen’s triangle), your second finger over the mastoid tip, and your third finger between the two. A positive test indicates acute mastoiditis.
How Do You Examine the External Auditory Canal?
- Examination without a speculum: Pull the pinna upwards and backwards. At the same time, use your other hand to pull the tragus forwards by stretching the preauricular skin. Look for meatal stenosis or atresia, swelling in the canal walls (furuncle), sagging of the posterosuperior canal wall (acute mastoiditis), growth, and canal contents such as wax, discharge, granulations, keratosis, vesicles, or a foreign body.
- Examination with a speculum: The speculum straightens the canal and bypasses the outer hairy part. Use the largest speculum that fits comfortably. Always examine without a speculum first; otherwise, you may miss important findings in the outer part of the canal.
How Do You Examine the Tympanic Membrane?
First, clean the external auditory canal of debris, wax, and discharge. Then, examine the following features:
- Colour: A normal tympanic membrane appears pearly white with a sharp cone of light. A retracted membrane looks dull and loses the cone of light. Infection makes the membrane congested and red. Otitis media with effusion or hemotympanum gives a bluish hue. Tympanosclerosis appears as a whitish patch.
- Retraction: Assess the position of the pars tensa and pars flaccida. Grade the retraction if present. Note whether the retraction pockets are self‑cleaning or retain debris.
- Bulging: You can see bulging of the tympanic membrane in acute otitis media or otitis media with effusion.
- Perforations: Note the size (percentage of membrane loss), position (which quadrants or thirds are involved), number (single or multiple), and margins (irregular in traumatic perforation, regular in chronic otitis media). Draw a diagram of the tympanic membrane findings in the patient’s notes.
- Mobility: Check mobility using pneumatic otoscopy or Siegel’s speculum. Mobility reduces in otitis media with effusion, otosclerosis, and tympanosclerosis. An atelectatic membrane, however, is hypermobile. You cannot perform pneumatic otoscopy in the presence of a perforation.
- Middle ear: If a perforation exists, examine the middle ear through it. Note the colour of the middle ear mucosa (normally pale pink), the presence of discharge, and the status of the ossicular chain. For example, you can see the incudostapedial joint through a posterosuperior perforation.
How Do You Examine the Eustachian Tube?
You can sometimes see the tympanic end of the eustachian tube through an anterior tympanic membrane perforation. You examine the pharyngeal end during posterior rhinoscopy. You test the function of the eustachian tube separately.
How Do You Examine the Facial Nerve?
- Motor function: Ask the patient to perform facial expressions: frowning, closing the eyes tightly, and showing the teeth.
- Special sensory function (taste): Test taste separately for both halves of the tongue. Ask the patient to protrude the tongue and keep it out. Wipe the tongue with a tissue paper. Apply solutions of sugar (sucrose), quinine (bitter), and salt (NaCl) one at a time. Ask the patient to identify the taste. After each substance, make the patient rinse the mouth. Repeat the procedure on the other side after cleaning the tongue.
- General sensory function: Test touch sensation on the floor of the external auditory canal. Loss of this sensation (Hitselberger’s sign) occurs in vestibular schwannoma.
What Other Examinations Should You Perform for an Ear Patient?
Perform tuning fork tests (Rinne, Weber, and absolute bone conduction). Examine the relevant cranial nerves. Test balance by looking for spontaneous nystagmus, assessing gait, performing Romberg’s test, and testing cerebellar function (dysmetria, past pointing, asynergia, dysdiadochokinesis, rebound test). Finally, examine the nose, paranasal sinuses, and nasopharynx because ear problems often result from nasal and sinus pathologies such as a deviated nasal septum or sinusitis.
Examination of the Nose and Paranasal Sinuses
How Do You Examine the External Nose?
Examine the skin of the nose and the external nasal framework under good illumination. Look for any sinus (nasal dermoid sinus), signs of inflammation (furuncle), scar from previous surgery, swelling (nasal dermoid or mesenchymal tumour), or growth and ulceration (malignancy). Inspect the nasal framework for external nasal deformity such as a crooked nose, hump, or widening due to an intranasal growth. Finally, palpate the nose for tenderness, crepitus of the nasal bones (fracture), and fluctuation.
How Do You Examine the Nasal Vestibule?
Gently lift the tip of the nose with your gloved thumb. This manoeuvre reveals a furuncle, a dislocated caudal end of the septum, a papilloma, or a tumour.
How Do You Perform Anterior Rhinoscopy?
Focus the light on the nose. Hold the sterile nasal speculum (Thudicum or Vienna type) in your non‑dominant hand. Introduce the two prongs into the nasal cavity in a closed position, then open them once positioned. This technique avoids trapping the vestibular hairs. Gently move the patient’s head to obtain a panoramic view of the nasal cavity. Repeat the procedure for the other side.
What do you visualise?
- Nasal cavity space: Atrophic rhinitis gives a wider cavity due to turbinate atrophy. A small cavity suggests turbinate hypertrophy, a deviated nasal septum, or a polyp or growth.
- Nasal septum: Look for any deviation (C‑shaped, S‑shaped, or spur), perforation (anterior or posterior), bleeding points (especially in Little’s area), thickening, swelling due to haematoma or abscess (bilateral), or growth.
- Floor of the nasal cavity: Look for a foreign body, growth, fistula, or swelling.
- Lateral wall of the nose: Examine the turbinates and their respective meatuses. Note the size of each turbinate (hypertrophy or atrophy), shape (paradoxical concavity towards the medial side), and colour of the overlying mucosa (congested or bluish). Examine the meatuses for discharge (sinusitis or nasopharyngeal obstruction) and mass (polyp or growth).
- Probing: Probe any nasal mass to ascertain its origin, pain sensitivity, and bleeding tendency. For example, an antrochoanal polyp is painless, does not bleed on touch, and allows you to pass the probe all around it.
How Do You Perform Posterior Rhinoscopy?
Ask the patient to open the mouth and breathe through the nose. Hold the posterior rhinoscopy mirror in your dominant hand and warm its mirror side. Depress the tongue with a tongue depressor using your non‑dominant hand. Introduce the mirror into the oral cavity with the mirror side facing one side. Without touching the soft palate, place the mirror in the oropharynx and then turn it upwards. Focus the light sharply onto the mirror, which then reflects the structures of the nasopharynx. Gently move the mirror to complete the assessment.
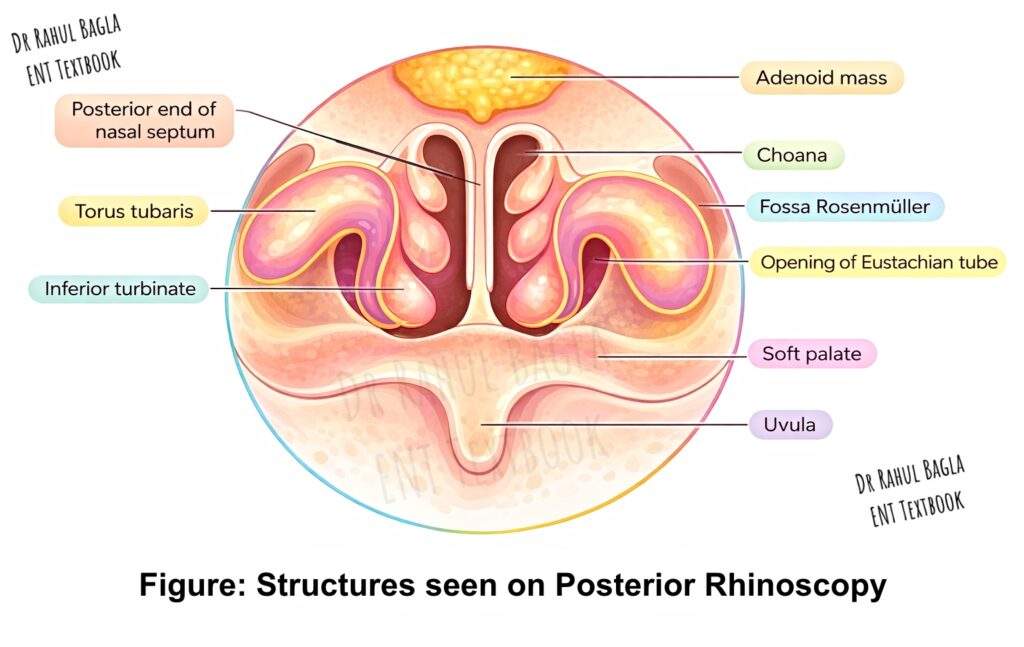
Structures visualised: Adenoids, the posterior ends of all three turbinates and three meatuses, the posterior end of the nasal septum, the pharyngeal end of the eustachian tube, the torus tubarius, the fossa of Rosenmüller, and the medial surface of the soft palate.
How Do You Test Nasal Patency?
- Cold spatula test: Place a cold metallic tongue depressor below both nostrils. Ask the patient to breathe normally. Compare the amount of mist formation on the tongue depressor from each side.
- Cotton wool test: Hold a wisp of cotton below each nostril alternately. The movement of the cotton indicates the amount of exhaled air. Alternatively, gently occlude one nostril with your gloved thumb (without distorting the nasal valve) and examine the other side.
How Do You Perform the Smell Test?
Test each nostril separately. Ask the patient to close the eyes. Place a substance with a known smell (tea, coffee, rose oil, or clove oil) close to the nostril and ask the patient to identify it.
How Do You Examine the Paranasal Sinuses?
- Maxillary sinus: Inspect the skin overlying the cheek for swelling, signs of inflammation, scar, or ulceration. Inspect the upper lip, hard palate, upper alveolar ridge, and upper gingivolabial sulcus for swelling or bulge, oroantral fistula, or ulceration. Elicit maxillary sinus tenderness by putting thumb pressure over the canine fossa and noting any wincing. Palpate the lower orbital margin; blunting of this margin suggests orbital extension of disease from the maxillary sinus.
- Ethmoid sinus: Inspect the root of the nose, medial canthus, and both eyelids for swelling, sinus, inflammation, or growth. Elicit anterior ethmoid tenderness by applying digital pressure over the medial wall of the orbit, above the medial canthus.
- Frontal sinus: Inspect the forehead, upper orbital margin, and root of the nose. Look for signs of inflammation, swelling or bulge, sinus, abscess (Pott’s puffy tumour), or fistula. Elicit frontal sinus tenderness by applying digital upward pressure just above the medial canthus or over the floor of the sinus. Test the anterior wall of the sinus for tenderness by pressing above the medial part of the eyebrow.
- Orbital examination: Check for proptosis, visual acuity, eyeball movements, and colour vision.
Note: The transillumination test for paranasal sinuses is now obsolete.
Examination of the Oral Cavity
How Do You Examine the Oral Cavity Systematically?
Examine the oral cavity from anterior to posterior, covering all subsites sequentially. Sterilise all instruments before introducing them into the mouth.
Using the tongue depressor: The tongue depressor is vital for examining the oral cavity and oropharynx. Use two tongue depressors ideally. To examine the lips, cheek, and vestibule, gently retract these structures with the tongue depressor, avoiding known tender sites. Do not inadvertently touch the teeth and gums. To examine the retromolar trigone and tonsillolingual sulcus, use two tongue depressors: one retracts the cheek, and the other retracts the tongue to the opposite side. To examine the oropharynx, place the tongue depressor on the anterior two‑thirds of the tongue while the tongue lies relaxed. Do not touch the posterior one‑third of the tongue because this triggers the gag reflex. In chronic tonsillitis, you can press the tonsils with the tongue depressor to express tonsillar debris (Irwin Moore’s sign).
- Lips: Inspect both the cutaneous and mucosal surfaces for ulcers, swelling, scars, or vascular malformations. Examine the upper lip for a cleft lip.
- Vestibule and cheek: Inspect the mucosa for colour changes (white patches in submucosal fibrosis, leukoplakia, or candidiasis; red patches in erythroplakia or healing ulcers; purple patches in lichen planus; yellow spots in Fordyce’s spots), ulceration (aphthous ulcers, Behçet’s disease, malignancy, or snail track ulcers of syphilis), disease‑specific lesions (target lesions in erythema multiforme, chancre), parotid duct opening (look for inflammation or discharge), blisters (pemphigus), cysts (mucous retention cyst), and vascular malformations. Pay special attention to the upper and lower gingivobuccal sulci because lesions, especially malignancies, often go unnoticed here in early stages.
- Teeth and gingiva: Examine for loose teeth (loosening may indicate underlying malignancy), growth, ulceration, carious teeth, sharp teeth (can cause dental ulcers on the lateral border of the tongue), redness of the gingiva (gingivitis), and malocclusion (temporomandibular joint dislocation or mandibular fractures).
- Hard palate: Examine for colour changes (leukoplakia, erythroplakia), abrasions, signs of inflammation, ulcers, growth, vascular lesions, cleft palate, and oroantral fistula.
- Anterior two‑thirds of the tongue: Examine the size (macroglossia in Down syndrome, Beckwith’s syndrome, cretinism, tongue abscess, or lymphangioma), growth (benign or malignant), colour change (leukoplakia, hairy leukoplakia with elongation of filiform papillae), ulceration (aphthous ulcer, syphilis, tuberculosis, malignancy), tongue movements (deviation to the side of hypoglossal nerve paralysis, difficulty in protrusion due to tongue or floor of mouth malignancy), loss of taste buds (geographic tongue, iron deficiency anaemia), and tongue tie (congenitally short frenulum).
- Floor of the mouth: Gently lift the tongue with a tongue depressor. Examine the ventral aspect of the tongue and the floor of the mouth for any swelling (ranula, dermoid), vascular malformation, ulcers, growth, and the openings of both submandibular ducts. Look for any discharge from these ducts.
- Retromolar trigone: Examine for growth and ulceration.
- Palpation of the oral cavity: Perform digital palpation with a gloved finger. Palpate any growth or swelling for consistency, raised temperature, tenderness, aberrant pulsations, and submucosal extent. Perform bimanual examination of the floor of the mouth to differentiate between enlargement of submandibular lymph nodes (level Ib) and the submandibular gland. Palpate the submandibular duct area for intraductal stones.
- Cervical lymph nodes: Finally, examine the cervical lymph nodes, especially levels I to V.
Examination of the Oropharynx
How Do You Examine the Oropharynx?
Perform the initial oropharyngeal examination with a tongue depressor. Remember to press only the anterior two‑thirds of the tongue; pressing the posterior one‑third triggers the gag reflex. Because inspection alone is not always sufficient, combine it with palpation and indirect laryngoscopy or 90° telescopic examination.
- Tonsils, anterior and posterior pillars: Grade the tonsil size according to the American Academy of Otolaryngology grading system (I to IV). Unilateral enlargement suggests lymphoma or malignancy. The tonsil may appear enlarged when a parapharyngeal abscess or growth pushes it medially. In a peritonsillar abscess, the tonsil is pushed medially. Bilateral enlargement usually indicates acute or recurrent tonsillitis. Examine the tonsillar crypts for pus debris (follicular tonsillitis) or concretions (tonsilloliths). Look for a membrane over the tonsil, an ulcer (malignancy, aphthous ulcer, tuberculosis, Vincent’s angina, traumatic, leukaemia, agranulocytosis), or a swelling (malignancy, tonsillar cyst). Both pillars may appear congested in chronic tonsillitis. Pressing the anterior pillars may express cheesy debris from the tonsillar crypts in chronic tonsillitis (Irwin Moore’s sign). Palpate the tonsil and pillars with a gloved finger to confirm the consistency of any mass and to define its extent (you can simultaneously palpate the base of the tongue).
- Soft palate: Examine the position of the uvula. A mass effect from a tonsillar growth or peritonsillar abscess may push the uvula to the opposite side. Look for obvious ulcers, redness, perforation, arteriovenous malformations, or swelling. Assess soft palate movement by asking the patient to say “Aa.” Paralysis of one side makes the uvula point towards the normal side. A bifid uvula and a midline blue line (due to soft palate muscle separation) with notching of the posterior edge of the hard palate indicate a submucous cleft palate.
- Base of the tongue: You cannot completely examine the base of the tongue on direct inspection alone. Therefore, perform digital palpation and indirect laryngoscopy. Indirect laryngoscopy reveals swelling (lingual thyroid), growth (malignancy or benign tumour), ulceration (aphthous ulcer or malignancy), congestion (lingual tonsillitis), or arteriovenous malformation. Perform digital palpation with a gloved finger of your dominant hand. In children, insert one finger of your other hand externally between the patient’s jaws to prevent cheek bite. Digital palpation reveals the submucosal extent of a growth, aberrant pulsations, and any tenderness.
- Posterior pharyngeal wall: Examine the posterior pharyngeal wall directly using your light source and a tongue depressor. Look for growth, ulceration, post‑nasal drip, and lymphoid hypertrophy.
Examination of the Larynx and Hypopharynx
How Do You Examine the Larynx Externally?
- Inspection: Examine the skin over the laryngeal framework for scars, sinuses, fistulas, ulcerations, or signs of inflammation. Inspect for laryngeal framework widening.
- Palpation: Palpate the laryngeal framework for swelling, tenderness, and surgical emphysema. Then, check for laryngeal crepitus. Hold the larynx with your index finger, middle finger, and thumb. Push the larynx posteriorly and then move it from side to side. Feel for the rubbing of the laryngeal framework over the bodies of the cervical vertebrae. Laryngeal crepitus is present when you feel this rubbing. It is absent in post‑cricoid malignancy and in a huge retropharyngeal abscess.
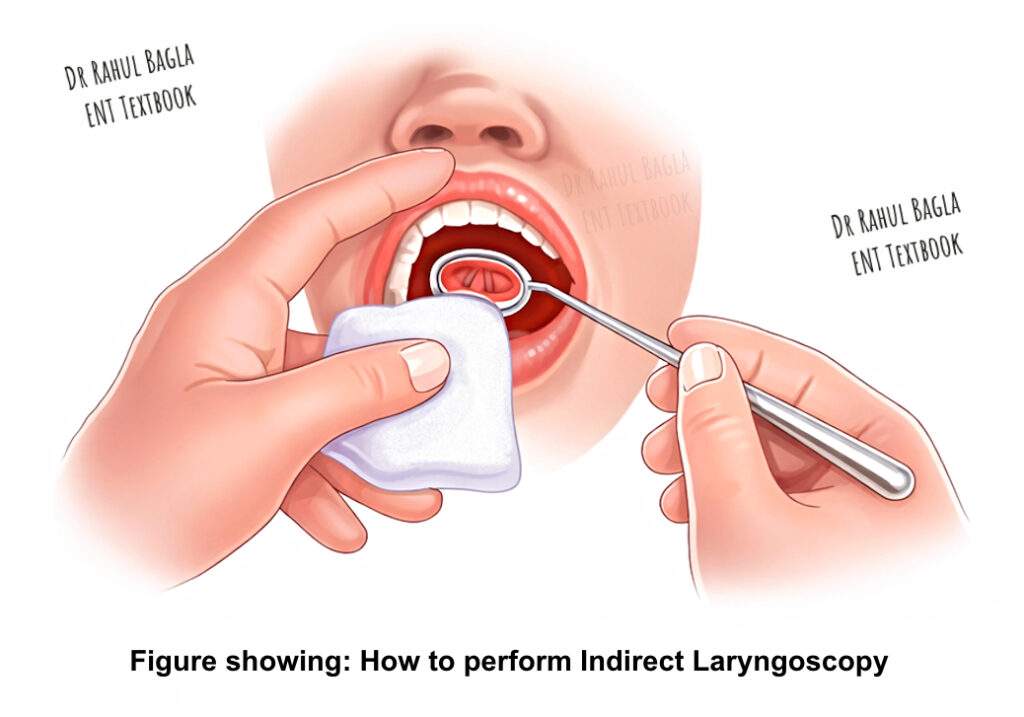
How Do You Perform Indirect Laryngoscopy?
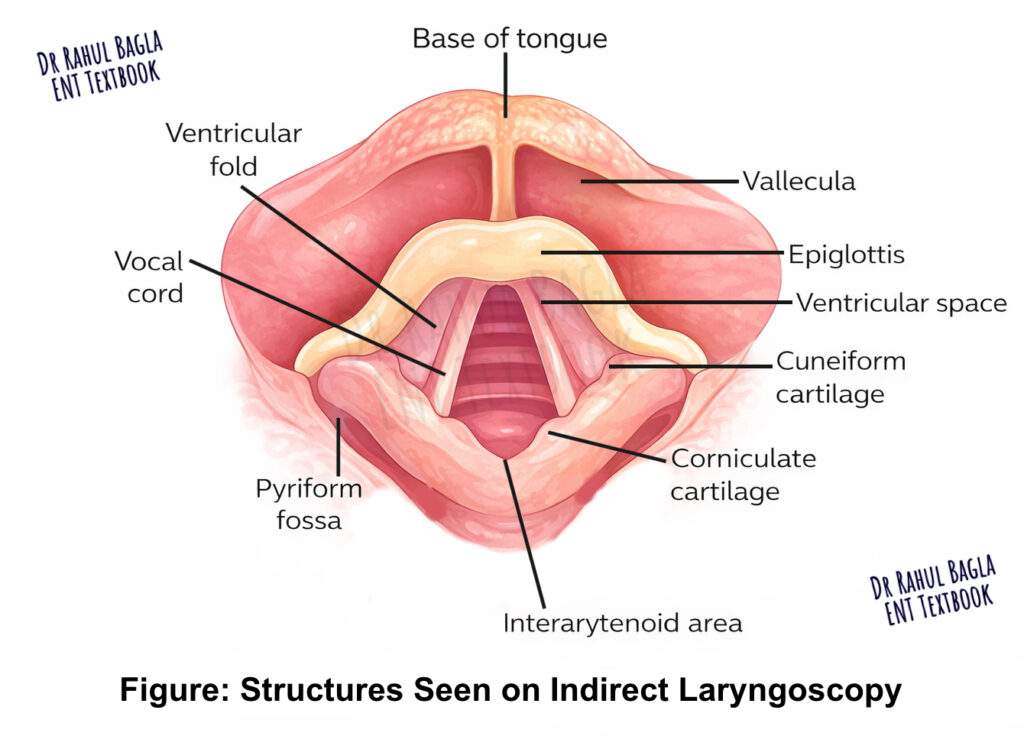
Explain the procedure to the patient. Ask the patient to sit erect with the neck and head slightly inclined towards you. Ask the patient to protrude the tongue and breathe through the mouth. Hold the tongue with a gauze piece using your middle finger, ring finger, and thumb. The gauze prevents the tongue from rubbing against the lower central incisors. Use your index finger to lift the upper lip. Warm the mirror side of the laryngeal mirror over a spirit lamp or warmer. Check the temperature on the back of your hand. Introduce the mirror into the oropharynx and focus the light from your head mirror onto it. Examine the following structures sequentially: base of the tongue, valleculae, medial and lateral glossoepiglottic folds, epiglottis, aryepiglottic folds, pyriform sinuses, false vocal cords, true vocal cords, arytenoids, anterior and posterior commissures, and the subglottis. Assess vocal cord movements during phonation (“Aa” for adduction, “Ee” for tension) and during deep inspiration (abduction).
What Is Rigid Telescopic Examination of the Larynx?
The procedure is similar to indirect laryngoscopy; however, you use an angled rigid telescope instead of a laryngeal mirror. This technique provides better illumination and a superior view of the endolaryngeal and hypopharyngeal structures.
How Do You Assess Voice?
Assess the quality of the voice (hoarse, breathy, feeble, dysphonic) and measure the maximum phonation time.
What Else Should You Examine?
Finally, examine the cervical lymph nodes thoroughly.
—-End of the chapter—-
High‑Yield Points for NEET PG and University Exams
- Always examine the symptomatic ear first; if both are affected, either ear can go first.
- Use the largest aural speculum that fits comfortably into the external auditory canal.
- Examination without a speculum must precede examination with a speculum to avoid missing outer canal findings.
- A normal tympanic membrane is pearly white with a sharp cone of light.
- The three‑point finger test for mastoid tenderness uses fingers on the cymba concha, mastoid tip, and the area between them.
- Hitselberger’s sign refers to loss of touch sensation on the floor of the external auditory canal in vestibular schwannoma.
- Laryngeal crepitus is absent in post‑cricoid malignancy and a huge retropharyngeal abscess.
- Irwin Moore’s sign is the expression of cheesy debris from tonsillar crypts on pressing the anterior pillar in chronic tonsillitis.
- You should not touch the posterior one‑third of the tongue with a tongue depressor because it triggers the gag reflex.
- The cold spatula test and cotton wool test assess nasal patency.
- The fossa of Rosenmüller is a common site for nasopharyngeal carcinoma; therefore, examine it carefully during posterior rhinoscopy.
Clinical Case Scenarios for Viva and Practical Exams
Case 1. A 45‑year‑old patient presents with right‑sided hearing loss and a sensation of fullness in the right ear for 2 months. On otoscopy, you see a dull, retracted tympanic membrane with a visible fluid level. The left ear is normal. Most likely diagnosis: Right serous otitis media. What is your next step? Perform nasopharyngeal endoscopy to rule out an occult nasopharyngeal carcinoma. Why? Because unilateral serous otitis media in an adult is nasopharyngeal carcinoma until proven otherwise.
Case 2. A 30‑year‑old patient complains of left‑sided nasal obstruction and recurrent left‑sided headache. On anterior rhinoscopy, you see a pale, smooth, mobile mass arising from the lateral wall of the left nasal cavity. Probing confirms that the mass is non‑tender, does not bleed easily, and you can pass the probe all around it. Most likely diagnosis: Antrochoanal polyp. What is your next step? Order a CT scan of the paranasal sinuses to confirm the origin from the maxillary sinus antrum and to plan for endoscopic sinus surgery.
Case 3. A 55‑year‑old smoker presents with hoarseness of voice for 3 months. On indirect laryngoscopy, you see a whitish, irregular growth on the right true vocal cord. The right vocal cord moves poorly, whereas the left cord moves normally. Most likely diagnosis: Right vocal cord malignancy (squamous cell carcinoma). What is your next step? Perform direct laryngoscopy with biopsy under general anaesthesia.
Case 4. A 25‑year‑old patient presents with a history of recurrent sore throat and halitosis. On oropharyngeal examination, you press the left anterior pillar with a tongue depressor and express cheesy, foul‑smelling debris from the tonsillar crypt. Most likely diagnosis: Chronic tonsillitis with tonsillar concretions. What is this sign called? Irwin Moore’s sign.
Case 5. A patient presents with a painless swelling in the right upper neck for 6 weeks. On examination, you find a 3 cm firm, non‑tender node at level II. Nasopharyngeal endoscopy reveals a small irregular growth in the right fossa of Rosenmüller. Most likely diagnosis: Nasopharyngeal carcinoma with cervical metastasis. What is the most common presenting symptom of nasopharyngeal carcinoma? Cervical lymphadenopathy (60–90% of patients).
NEET PG‑Style MCQs with Answers and Explanations
- The largest speculum that fits comfortably into the external auditory canal is used for otoscopy because: A. Smaller speculums cause more pain B. Larger speculums provide a better view and seal C. The ear canal is straight in all patients D. Smaller speculums damage the canal skin.
- Hitselberger’s sign refers to: A. Loss of taste on the anterior two‑thirds of the tongue B. Loss of touch sensation on the floor of the external auditory canal C. Loss of corneal reflex D. Loss of facial nerve motor function.
- Laryngeal crepitus is absent in which of the following conditions? A. Acute laryngitis B. Vocal cord nodule C. Post‑cricoid malignancy D. Reinke’s oedema.
- A 45‑year‑old patient presents with unilateral serous otitis media. What is the most appropriate next step? A. Myringotomy with tube insertion B. Prescribe oral decongestants C. Nasopharyngeal endoscopy D. MRI brain.
- Which tuning fork frequency is best for bone conduction testing because it avoids tactile response? A. 128 Hz B. 256 Hz C. 512 Hz D. 1024 Hz.
- During anterior rhinoscopy, you see a pale, smooth mass arising from the lateral wall. Probing reveals that you can pass the probe all around the mass. This mass is most likely: A. Nasal polyp B. Antrochoanal polyp C. Inverted papilloma D. Juvenile nasopharyngeal angiofibroma.
- The three‑point finger test for mastoid tenderness uses pressure on which three points? A. Tragus, mastoid tip, and preauricular area B. Cymba concha, mastoid tip, and the area between them C. Mastoid antrum, mastoid tip, and stylomastoid foramen D. Postauricular groove, mastoid tip, and inion.
- A patient has deviation of the tongue to the left on protrusion. This indicates paralysis of which cranial nerve? A. Left hypoglossal nerve B. Right hypoglossal nerve C. Left glossopharyngeal nerve D. Right glossopharyngeal nerve.
- Irwin Moore’s sign is positive in: A. Acute tonsillitis B. Chronic tonsillitis C. Peritonsillar abscess D. Tonsillar malignancy.
- Which of the following structures is NOT visualised during posterior rhinoscopy? A. Fossa of Rosenmüller B. Torus tubarius C. Pharyngeal end of eustachian tube D. True vocal cords.
Answers: 1: B. 2: B. 3: C. 4: C. 5: C. 6: B. 7: B. 8: A. 9: B. 10: D.
Frequently Asked Questions in Viva
- What is the correct order of examining an ENT patient? You should first perform a general physical examination, then examine the ear, nose, oral cavity, oropharynx, and finally the larynx and hypopharynx using appropriate instruments for each region.
- Why do you warm a laryngeal mirror before use? You warm the mirror to prevent fogging from the patient’s warm, moist breath; however, always check the temperature on the back of your hand to avoid burning the mucosa.
- What is the difference between anterior and posterior rhinoscopy? Anterior rhinoscopy examines the anterior part of the nasal cavity using a nasal speculum, whereas posterior rhinoscopy examines the nasopharynx and posterior nasal structures using a mirror placed in the oropharynx.
- How do you perform the Rinne test and what do the results mean? Place a vibrating tuning fork on the mastoid tip (bone conduction), then move it in front of the ear (air conduction). A normal (Rinne positive) result means air conduction lasts longer than bone conduction. An abnormal (Rinne negative) result means bone conduction lasts longer, indicating conductive hearing loss.
- What is laryngeal crepitus and why is it important? Laryngeal crepitus is the rubbing sensation you feel when moving the larynx from side to side over the cervical vertebrae. Its absence suggests a post‑cricoid malignancy or a large retropharyngeal abscess.
- How do you examine the facial nerve during an ENT examination? You test motor function by asking the patient to frown, close the eyes tightly, and show the teeth. You test taste (special sensory) on the anterior two‑thirds of the tongue, and you test general sensory function on the floor of the external auditory canal.
- What is the significance of unilateral serous otitis media in an adult? Unilateral serous otitis media in an adult is nasopharyngeal carcinoma until proven otherwise; therefore, you must perform nasopharyngeal endoscopy.
- What instruments are essential for a basic ENT examination setup? You need a bull’s eye lamp with head mirror (or headlight), otoscope with speculums, tuning forks (256, 512, 1024 Hz), nasal speculum, tongue depressor, laryngeal mirror, posterior rhinoscopy mirror, Jobson Horne probe, and crocodile forceps.
Practical Tips for Viva and Clinical Examinations
How to present a case of chronic otitis media in viva: “This patient presents with a 5‑year history of right‑sided, non‑painful, intermittent ear discharge. On otoscopy, I see a central perforation in the right tympanic membrane with a small amount of mucoid discharge. The middle ear mucosa appears pale pink. Tuning fork tests show a Rinne negative on the right and a Weber lateralising to the right, confirming a conductive hearing loss. The left ear is normal. Therefore, I diagnose this as chronic otitis media, mucosal type, and I plan to perform a pure tone audiogram and a high‑resolution CT scan of the temporal bone before considering tympanoplasty.”
Common examiner questions and how to answer them:
- Q: How do you hold the otoscope and why? A: I hold the otoscope like a pen from its proximal end. This grip gives me fine control and prevents me from inserting the speculum too deeply.
- Q: Why do you pull the pinna upwards and backwards during otoscopy? A: Pulling the pinna upwards and backwards straightens the external auditory canal because the cartilaginous part is directed upwards and backwards. This manoeuvre gives me a direct view of the tympanic membrane.
- Q: What is the normal colour of the tympanic membrane and what does a blue colour indicate? A: The normal tympanic membrane is pearly white. A blue colour indicates blood (haemotympanum) or a blue‑black fluid in otitis media with effusion.
- Q: How do you differentiate between a central and an attic perforation? A: A central perforation has a rim of tympanic membrane remnant all around it. An attic (marginal) perforation involves the pars flaccida and has no superior remnant; therefore, it carries a higher risk of cholesteatoma.
- Q: What is the most common site for a nasal polyp on anterior rhinoscopy? A: The most common site is the middle meatus, originating from the ethmoid air cells.
- Q: How do you test the mobility of the tympanic membrane? A: I use a pneumatic otoscope or Siegle’s speculum to apply positive and negative pressure. The normal tympanic membrane moves visibly with pressure changes.
- Q: What is the significance of a positive fistula test? A: A positive fistula test (nystagmus or dizziness on applying pressure to the ear canal) indicates an abnormal communication between the middle and inner ear, most commonly a cholesteatoma‑induced lateral semicircular canal fistula.
Flowchart: Systematic Approach to ENT Examination
Step 1: Prepare the environment and equipment → Quiet room, good illumination, sterile instruments, verbal consent.
Step 2: Perform general physical examination → Nourishment, consciousness, pallor, icterus, cyanosis, clubbing, lymph nodes, pulse, BP.
Step 3: Examine the ear → Pinna and postauricular region → External auditory canal (without and with speculum) → Tympanic membrane (colour, retraction, perforation, mobility) → Tuning fork tests → Facial nerve → Balance tests if indicated.
Step 4: Examine the nose → External nose → Vestibule → Anterior rhinoscopy → Posterior rhinoscopy → Nasal patency tests → Smell test → Paranasal sinuses (inspection, palpation, tenderness).
Step 5: Examine the oral cavity and oropharynx → Lips → Vestibule and cheek → Teeth and gingiva → Hard palate → Anterior tongue → Floor of mouth → Retromolar trigone → Oropharynx (tonsils, pillars, soft palate, base of tongue, posterior pharyngeal wall).
Step 6: Examine the larynx and hypopharynx → External examination (crepitus) → Indirect laryngoscopy → Voice assessment.
Step 7: Examine the neck → Cervical lymph nodes (levels I to V).
—-End—-
Author:

Dr. Rahul Bagla
MBBS (MAMC, Delhi) MS ENT (UCMS, Delhi)
Fellow Rhinoplasty & Facial Plastic Surgery.
Renowned Teaching Faculty
Mail: msrahulbagla@gmail.com
India
———– Follow us on social media ————
- Follow our Facebook page: https://www.facebook.com/Dr.Rahul.Bagla.UCMS
- Follow our Instagram page: https://www.instagram.com/dr.rahulbagla/
- Subscribe to our Youtube channel: https://www.youtube.com/@Drrahulbagla
- Please read. Anatomy of External Ear. https://www.entlecture.com/anatomy-of-ear/
- Please read. Anatomy of Temporal Bone. https://www.entlecture.com/anatomy-of-temporal-bone/
- Please read. Stenger’s, Chimani Moos, Teal test. https://www.entlecture.com/special-tuning-fork-tests/
Keywords: Clinical examination is the backbone of ENT diagnosis because most ENT diseases show visible signs in the ear, nose, throat, and neck. Therefore, a systematic approach helps you avoid missing critical findings like cholesteatoma, nasopharyngeal carcinoma, vocal cord palsy, or oral malignancy. In addition, ENT examination becomes easier when you follow a fixed order, use proper illumination, and handle instruments correctly. This chapter provides a complete, exam-oriented ENT examination guide for MBBS and ENT PG students, including stepwise clinical methods, key instruments, high-yield tables, mnemonics, viva tips, MCQs, and clinical case scenarios.Clinical examination of ENT patient notes MBBS, How to perform otoscopy step by step, ENT examination instruments and their uses, Anterior rhinoscopy procedure video, Posterior rhinoscopy structures visualised, Tuning fork tests Rinne Weber interpretation, Indirect laryngoscopy technique for students, Laryngeal crepitus clinical significance, Hitselberger sign vestibular schwannoma, Three point finger test mastoid tenderness, Irwin Moore sign chronic tonsillitis, Unilateral serous otitis media adult NPC, ENT viva questions and answers practical exam, NEET PG ENT examination MCQs, CBME curriculum ENT clinical examination, ENT examination case scenarios for practicals, ENT examination mnemonics for students, Complete head and neck examination ENT, How to examine nasal cavity and sinuses, Oral cavity examination subsites sequence, Ent clinical examination steps, Ent examination for mbbs students, Ent examination notes pdf, Clinical examination of ear nose throat, How to examine ear in ent, Otoscopy examination steps, Tympanic membrane examination quadrants, Tuning fork tests rinne weber notes, Nose examination anterior rhinoscopy steps, Posterior rhinoscopy structures seen, Nasopharyngeal examination in ent, Oral cavity examination ent notes, Indirect laryngoscopy procedure steps, Laryngeal crepitus clinical significance, Cervical lymph node examination levels ent, Ent practical viva questions, Ent clinical methods cbme, Ent examination flowchart for students, Ent examination mcqs with answers, Ent case presentation format viva, Unilateral serous otitis media adult nasopharyngeal carcinoma, Antrochoanal polyp probing test, Tragal tenderness otitis externa sign, Mastoid tenderness three point finger test, Hitselberger sign vestibular schwannoma, Irwin moore sign chronic tonsillitis, Ent instruments list for practical exam, Bull’s eye lamp and head mirror use, Head mirror examination technique ent, Otoscope handling technique viva, Smell test cranial nerve ent, Nasal patency cold spatula test, Maxillary sinus tenderness canine fossa, Ethmoid sinus tenderness test, Frontal sinus tenderness clinical test, Oropharynx examination tonsil grading, Tonsil grading system aaohns, Vocal cord movement assessment indirect laryngoscopy, Hoarseness evaluation clinical examination ent, Neck node levels in head and neck cancer, Ent revision notes for neet pg, Ent short notes clinical examination, Ent mcq bank clinical methods, Ent practical exam guide india, Ent examination checklist for interns, Ent clinical skills osce, Ear examination in chronic otitis media, Cholesteatoma examination findings otoscopy, Tympanosclerosis appearance on tm, Otitis media with effusion examination findings, Examination of cranial nerves in ent patient, Balance examination in vertigo romberg test, Ent examination mnemonics for students, Ent clinical examination summary, Ent university exam important questions, Ent pg entrance exam clinical examination