Tracheostomy
Introduction
Tracheostomy is one of the most important life-saving procedures in ENT practice. It provides a secure airway, improves ventilation, facilitates secretion clearance, and is commonly required in airway obstruction, prolonged ventilation, and aspiration-risk conditions.

Tracheostomy: Definition and Purpose
Tracheostomy involves creating an opening in the anterior wall of the trachea and converting it into a stoma on the skin surface, establishing a connection between the trachea and cervical skin. While often used interchangeably with tracheotomy, which is one of the steps of open tracheostomy, Tracheotomy specifically refers to opening the trachea without cartilage removal, commonly performed in infants and children.

Anatomy of the Trachea
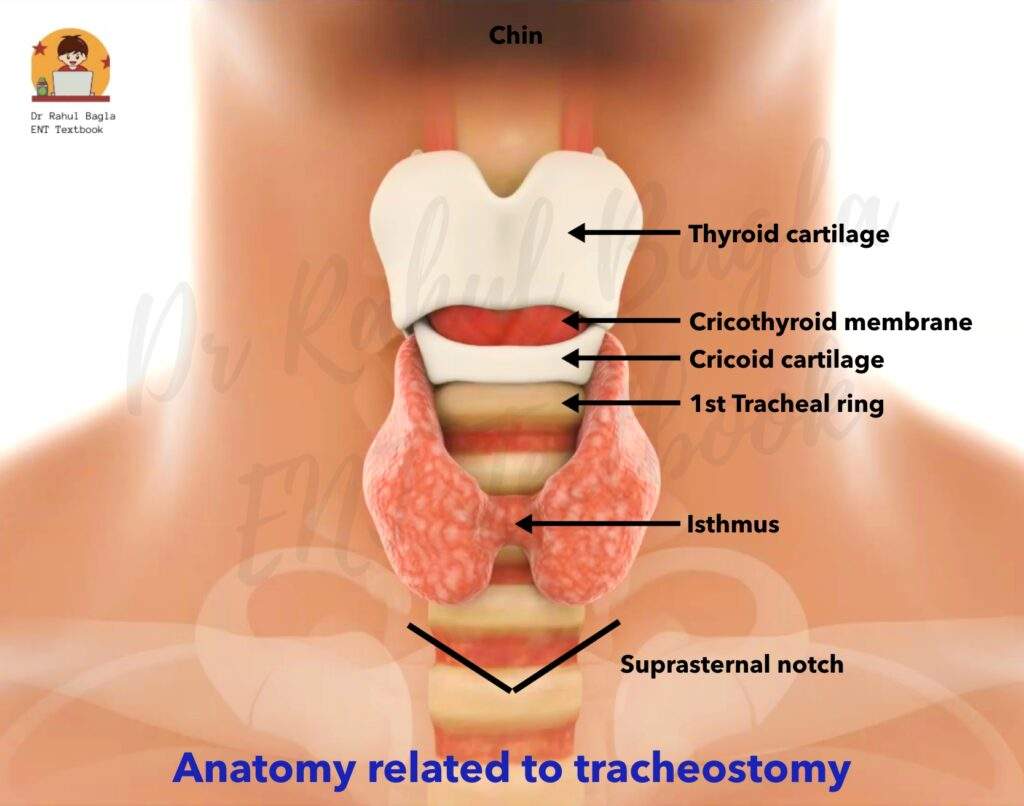
The trachea is a vital structure in the respiratory system, extending from the lower border of the cricoid cartilage (at the level of the C6 vertebra) to the carina and main stem bronchi (at the level of the T5 vertebra). It consists of 18 to 22 C-shaped cartilaginous rings, which provide structural support while allowing flexibility. In adults, the trachea is approximately 11 cm long (ranging from 10 to 13 cm).
- Posterior Wall: Lies anterior to the oesophagus.
- Anterior Relations: Covered by the sternohyoid and sternothyroid muscles (strap muscles).
- Thyroid Isthmus: Adheres to the anterior trachea, spanning the second to fourth tracheal cartilages.
Physiological Functions of Tracheostomy
1. Alternative Airway Pathway: Bypasses obstructions in the upper airway (from the lips to the tracheostome).
2. Improved Alveolar Ventilation: Enhances breathing efficiency by:
- Reducing dead space by 30–50% (normal dead space: 150 mL).
- Lowering airflow resistance compared to the nasopharyngeal or oropharyngeal route.
3. Airway Protection: Prevents aspiration of:
- Pharyngeal secretions (e.g., in bulbar paralysis or coma).
- Blood (e.g., from pharyngeal, laryngeal, or maxillofacial injuries).
4. Removal of Secretions: Facilitates removal of tracheobronchial secretions in patients unable to cough (e.g., coma, head injuries, respiratory paralysis) or when coughing is painful (e.g., chest or abdominal injuries).
5. Intermittent Positive Pressure Respiration (IPPR): Preferred over intubation for prolonged IPPR (>72 hours).
6. Anaesthesia Administration: Used when endotracheal intubation is difficult or impossible (e.g., laryngopharyngeal growths, trismus).
Disadvantages and Physiological Consequences of Tracheostomy
- Loss of Upper Airway Functions: Bypassing the upper airways eliminates warming, humidification, and filtering of inspired air, leading to drying of tracheal and bronchial epithelium, causing increased mucus production.
- Difficulty in Swallowing: The tracheostomy tube restricts the larynx, stopping it from moving upward as it normally does during swallowing. Additionally, the tube’s cuff can press against the oesophagus, making swallowing less effective. Deflating the cuff can improve swallowing.
- Sensory Loss: There is a loss of smell and reduced taste.
- Speech Impairment: There is a loss of voice. Fenestrated tubes or speaking valves can restore speech.
- Reduced Cough Efficiency: There is an inability to close the vocal cords, which reduces the effectiveness of the cough reflex and formation of positive intralaryngeal pressure, causing retention of the secretions.
- Activity Limitations: Loss of positive intralaryngeal pressure also impairs activities requiring the Valsalva manoeuvre (e.g., lifting heavy weights, childbirth). The patient cannot go for swimming.
Indications of Tracheostomy
- Respiratory Obstruction.
- Retained Secretions.
- Respiratory Insufficiency.
- Prolonged Ventilation.
- Elective Tracheostomy.

Contraindications of Tracheostomy
- Absolute Contraindications: None, as tracheostomy is a life-saving procedure.
- Relative Contraindications:
- Neck Cellulitis: Increases the risk of infection and complications.
- Bleeding Disorders: This may lead to excessive bleeding during the procedure.
Anatomical Classification of Tracheostomy
Tracheostomy is also classified based on the anatomical level of the tracheal incision:
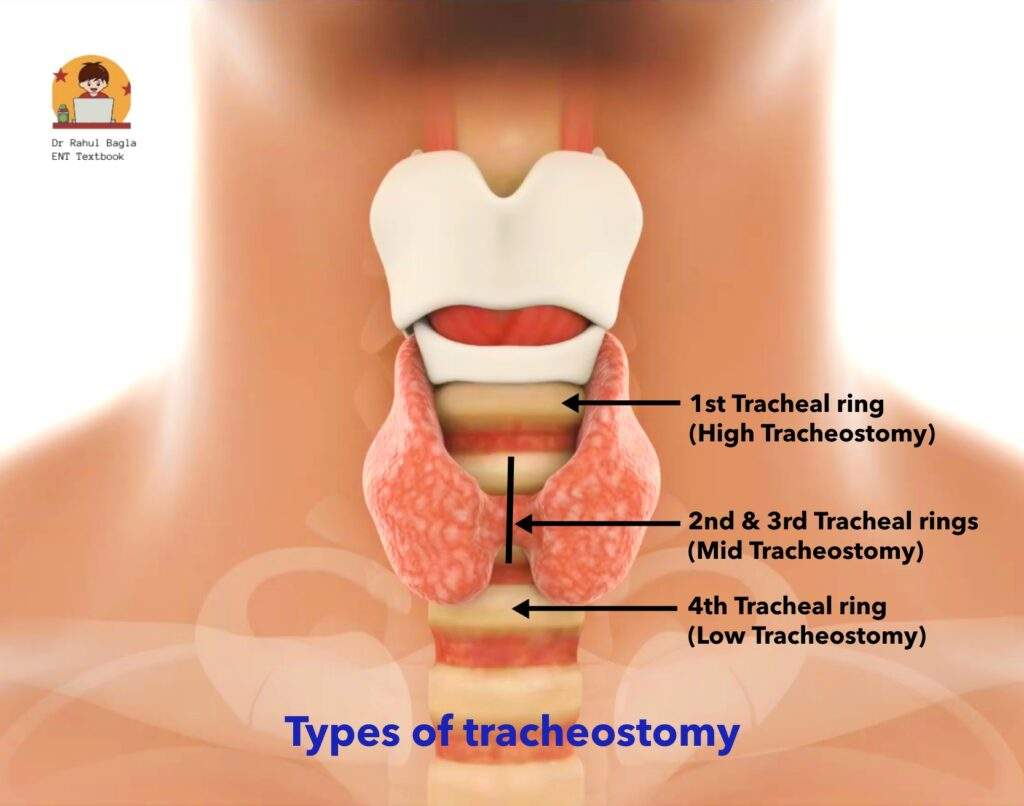
- High Tracheostomy: It is performed above the thyroid isthmus (at the level of the first tracheal ring). It causes perichondritis of the cricoid cartilage and subglottic stenosis; therefore, it is rarely performed, except in cases of laryngeal carcinoma where the larynx will be ultimately removed.
- Mid Tracheostomy: It is preferred and performed at the level of the second or third tracheal rings after dividing or retracting the thyroid isthmus.
- Low Tracheostomy: It is performed below the level of the thyroid isthmus (at the level of the fourth tracheal ring). At this level, the trachea is located deep inside the body and is positioned close to several large blood vessels. This makes the procedure more challenging. Also, the tracheostomy tube can press against the suprasternal notch (the dip at the base of the neck), which can cause discomfort and complications.
Types of Tracheostomy
Tracheostomy is classified into different types based on the technique and purpose. Each type has specific indications, advantages, and potential complications.
- Temporary Tracheostomy
- Permanent Tracheostomy
- Percutaneous Dilatational Tracheostomy
- Mini Tracheostomy
1. Temporary Tracheostomy.
Temporary tracheostomy is an open tracheostomy procedure performed for short-term airway management and can be reversed once the primary condition is resolved. It includes:
(i) Emergency Tracheostomy: This is done when there is an urgent need to establish the airway due to a complete or near-complete blockage. It is performed when other methods, like tracheal intubation or laryngotomy, are not possible. There are high risk of complications due to rushed conditions.
(ii) Elective Tracheostomy (syn. tranquil, orderly or routine tracheostomy): This is a planned, unhurried procedure. The patient is typically in an operating room with full surgical facilities available. An endotracheal tube can be placed, and the procedure can be done under local or general anaesthesia. It is of two types:
- Therapeutic: To relieve respiratory obstruction, remove secretions, or provide assisted ventilation.
- Prophylactic: To prevent anticipated airway obstruction or aspiration during head and neck surgeries.
Steps of Surgery (Open tracheostomy)
- Planning of the procedure. Whenever possible, surgery should be performed in the operating theatre under endotracheal intubation with aseptic conditions. This is especially important in infants and children. In case of emergency, it can also be done bedside.
- Positioning of the patient. The patient lies supine with a sandbag under the shoulders so that the neck is extended. This brings the trachea forward.
- Anaesthesia. No anaesthesia is required in unconscious patients or when it is an emergency procedure. In conscious patients, 2% lignocaine is infiltrated in the line of incision and the area of dissection. Sometimes, general anaesthesia with intubation is used.
- Making the incision. In case of emergency tracheostomy, a vertical incision is made in the midline of the neck, extending from the lower border of the cricoid cartilage to one finger breadth above the suprasternal notch. It gives rapid access with a minimum of bleeding and tissue dissection. In case of elective tracheostomy, a horizontal incision, 5 cm long, is made two fingers’ breadth above the sternal notch or midway between the cricoid cartilage and suprasternal notch. It has the advantage of a cosmetically better scar.
- Separation of strap muscles. After the incision, tissues are dissected in the midline. Dilated veins (especially anterior jugular veins) are either displaced or ligated. Strap muscles (sternohyoid and sternothyroid) are separated in the midline and retracted laterally to expose the thyroid gland.
- Thyroid gland. The thyroid isthmus can be retracted upwards by a blunt hook or can be divided between the clamps and suture ligated to expose the anterior wall of the trachea.
- Identification of the trachea. Confirm the trachea by palpating the cartilaginous rings of the trachea with the little finger or by inserting a needle in the trachea and checking the aspiration of air in a half-filled saline syringe. After confirmation, a few drops of 4% lignocaine are injected into the trachea to suppress cough when the trachea is incised.
- Creation of the Stoma. The pre-tracheal fascia is then separated using sharp dissection. The trachea is fixed with a hook and opened with a vertical incision between the second and fourth tracheal rings. The incision is further extended by a C-type of incision on both sides of the incision to convert into a circular opening. (Remember: In infants and children, avoid excision of circular pieces of tracheal wall to prevent long-term stenosis.) The first tracheal ring is never divided as perichondritis of cricoid cartilage with stenosis can result.
- Insertion of the tube. An appropriately sized tracheostomy tube is inserted and secured with tape (for different types and sizes of tracheostomy tubes).
- Skin incision should not be sutured or packed tightly as it may lead to the development of subcutaneous emphysema.
- A gauze dressing is placed between the skin and the flange of the tube around the stoma.
2. Permanent Tracheostomy (syn. end tracheostomy):
It is also an open tracheostomy procedure. It is carried out as part of laryngectomy or laryngopharyngectomy or after diversion procedures in patients having intractable aspiration. The lower stump of the trachea is permanently sutured to the skin, disconnecting it from the pharynx. The indications are bilateral abductor paralysis, laryngeal stenosis, or intractable aspiration.
3. Percutaneous Dilatational Tracheostomy (PDT):
It is a minimally invasive procedure in which the tracheal stoma is made through a dilation process, rather than a surgical incision, to place a tracheostomy tube. It is typically performed bedside in the ICU on intubated and monitored patients. PDT offers advantages such as avoiding patient transport to the operating theatre, reducing costs, and minimising nosocomial infections.
Steps of Surgery:
- Anaesthesia: It can be performed under local anaesthesia, conscious sedation, or general anaesthesia.
- Positioning: The neck is extended by placing a rolled towel between the shoulder blades.
- Incision: A small vertical incision (1.5–2 cm) is made 2 fingerbreadths above the suprasternal notch.
- Needle & Guidewire Insertion: Under bronchoscopic guidance, a needle is inserted into the trachea, and a guidewire is passed through it.
- Dilatation and Tracheostomy Tube Placement: The needle is removed, and the tracheal space is dilated sequentially. The tracheostomy tube, mounted on an obturator, is inserted over the guidewire. Placement is confirmed, and the endotracheal tube is removed.
- Indications: Same as for open tracheostomy, including prolonged ventilation, airway obstruction, and secretion management.
- Contraindications: Obesity, neck masses, difficult intubation, limited neck extension, uncorrectable coagulopathies, enlarged thyroid gland, tracheal deviation or infection at the site of incision.
- Complications: Paratracheal entry, haemorrhage, posterior tracheal wall damage, or surgical emphysema.
4. Mini Tracheostomy (Cricothyroidotomy).
Mini tracheostomy is a quick procedure used to open the airway in an emergency. It is done through the cricothyroid membrane (the soft area between the thyroid cartilage and the cricoid ring). It is mainly used as an emergency procedure to give the patient time until they can be taken to the operating room for a formal tracheostomy.
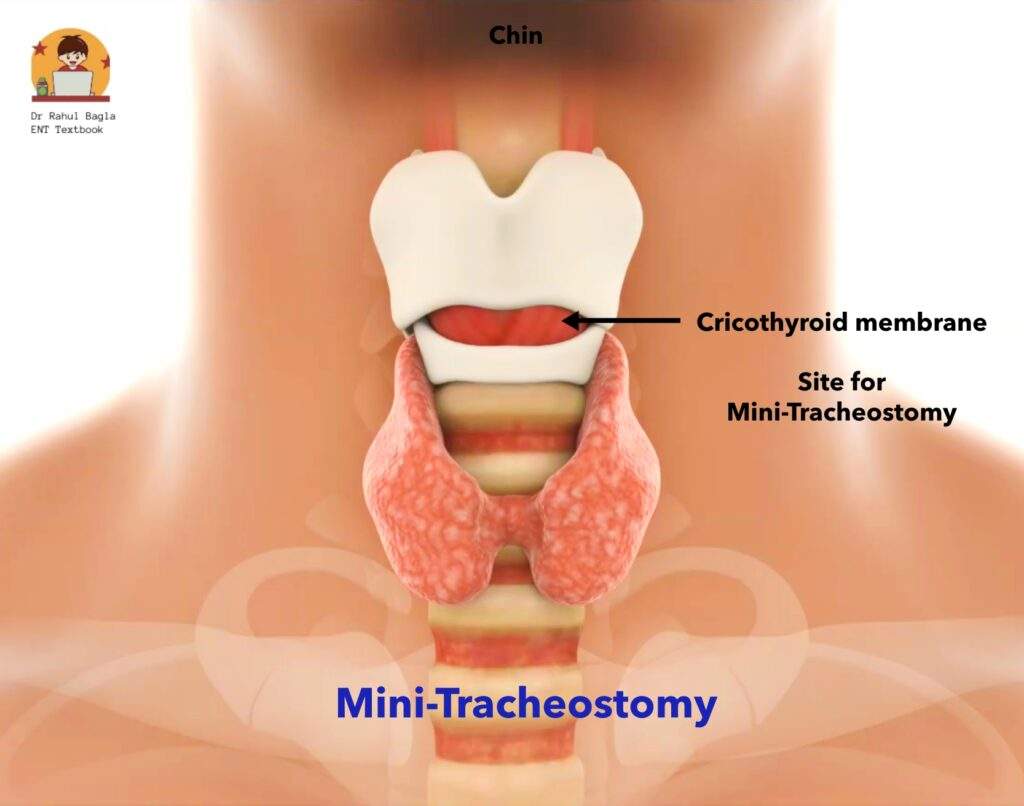
Steps of Surgery of Mini-Tracheostomy:
1. Positioning: The patient’s head and neck are extended to make the airway accessible.
2. Identification: The lower border of the thyroid cartilage and the cricoid ring are located.
3. Incision: A vertical cut is made on the skin over this area.
4. Opening the Airway: The cricothyroid membrane is cut with a horizontal incision.
5. Keeping the Airway Open:
- A small tracheostomy tube is inserted to keep the airway open.
- If a tube is not available, the handle of a knife can be inserted and turned at a right angle to keep the space open temporarily.
Since a mini tracheostomy is only a temporary solution, a proper tracheostomy should be performed as soon as possible. Delaying a proper procedure can lead to complications like:
- Perichondritis
- Subglottic oedema
- Laryngeal stenosis
Another option is Cricothyroid Needle Puncture. In this method, a large-bore intravenous (IV) catheter is inserted through the cricothyroid membrane to create a temporary airway.
Complications of Tracheostomy
A useful mnemonic to remember major complications is “TRACHEA” (Tube blockage, Recurrent laryngeal nerve injury, Aspiration, Cricoid damage, Haemorrhage, Emphysema, Apnoea).
1. Immediate Complications (During Surgery)
- Haemorrhage: Most common and life-threatening, often due to injury to the anterior jugular veins or thyroid isthmus. Trauma to major vessels can be fatal.
- Apnoea: It occurs after opening the trachea in patients with prolonged respiratory obstruction due to sudden CO2 washout, which removes the respiratory stimulus. Treatment is the administration of 5% CO2 in oxygen or providing assisted ventilation.
- Cricoid Cartilage Damage: It can lead to subglottic stenosis.
- Air Embolism: It is rare but life-threatening.
- Pneumothorax: It is caused by injury to the apical pleura.
- Recurrent Laryngeal Nerve Injury: It results in vocal cord paralysis.
- Aspiration of Blood: It can occur during the procedure.
- Oesophageal Injury: This can happen if the knife tip is pushed too hard while making the incision into the trachea. This may damage the oesophagus, which could lead to a condition called tracheoesophageal fistula (an abnormal connection between the trachea and oesophagus).
2. Intermediate Complications (First Few Hours/Days)
- Bleeding: It can be reactionary or secondary
- Tube Displacement or Extubation: It can be prevented by securing the tube properly or suturing the tube flanges to the skin.
- Tube Blockage: It can occur due to the formation of thick mucus or crusting.
- Subcutaneous Emphysema: If the tracheostomy tube or the trachea gets blocked and the skin incision is tightly closed, the expired air can be pushed into the soft tissues of the neck. It leads to subcutaneous emphysema, where air gets trapped under the skin. In some cases, the air can spread up to the lower eyelids and down to the upper chest. If the swelling is severe, it might even move the tube out of place. To treat this, the tight dressings around the stoma (the opening) should be removed, and any tight stitches should be removed. It is managed conservatively.
- Tracheitis and Tracheobronchitis: Inflammation with crusting in the trachea.
- Tracheoesophageal Fistula: It results from prolonged use of a cuffed tube or erosion by the tube tip.
- Tracheo-Arterial Fistula: Most commonly, this condition occurs in previously irradiated patients, especially if they’ve had a low tracheostomy. There’s usually no warning sign like a small bleed; instead, the first sign is often sudden massive bleeding. When this occurs, the tracheostomy tube must be replaced right away with a cuffed tube. The cuff should be inflated to prevent aspiration of the blood, and it also puts pressure on the bleeding vessel. The wound needs to be checked immediately because this complication has a very high risk of death. The artery most commonly involved is the innominate artery.
- Atelectasis and Lung Abscess: It occurs due to inadequate ventilation or infection.
- Wound Infection and Granulations: It occurs due to local infection or excessive tissue growth at the stoma site.
3. Late Complications (Weeks to Months Post-Procedure)
- Haemorrhage: Due to erosion of major vessels.
- Laryngeal Stenosis: Caused by perichondritis of the cricoid cartilage.
- Tracheal Stenosis: Results from tracheal ulceration or prolonged tube use.
- Decannulation Problems: Common in infants and children, often due to anatomical or functional issues.
- Persistent Tracheocutaneous Fistula: Occurs due to epithelialization of the stoma, requiring complete excision of the epithelised tract and closure in layers.
- Scarring Issues: Keloid or unsightly scars at the tracheostomy site.
- Tube Corrosion: Rare but can lead to aspiration of tube fragments into the tracheobronchial tree.
Postoperative Care of Tracheostomy
- Continuous supervision. After a tracheostomy, constant supervision is necessary to monitor for bleeding, tube displacement, or blockage. Experienced nursing care is important, and a nurse or caregiver should always be present. The patient should have a way to communicate, like a bell or a notepad.
- Suctioning protocol. Suctioning may be needed every 30 minutes or as required, using sterile catheters with a Y-connector to reduce suction force. Need for regular suctioning of secretions is initially there, but gradually the trachea adapts to the tube and secretions decrease. To avoid injury, suction should only be applied while withdrawing the catheter
- Humidification. To prevent crusting and tracheitis (inflammation of the trachea), it is important to keep the air moist. Since the nose’s natural ability to humidify air is lost, providing humidified air or oxygen is necessary. This can be done using a humidifier, steam tent, or nebuliser. If crusting still occurs, a few drops of saline or Ringer’s lactate can help loosen it. Thick secretions can be cleared using mucolytic agents like acetylcysteine or a mix of saline and soda bicarbonate.
- Tracheostomy tube care: A cuffed tube should be deflated periodically to avoid pressure necrosis or dilatation of the trachea. If the patient is not on a ventilator, the cuff should be deflated after the first 12 hours. The first tube change in children is done after 7 days; in adults, it’s after 3 days. A double-lumen tube requires the inner cannula to be cleaned regularly for the first 3 days. The outer tube should stay in place for 3–4 days to allow a track to form.
Decannulation.
Decannulation is the process of removing a tracheostomy tube once the patient’s condition has improved. Prolonged tube use should be avoided as it can cause infections, ulcers, scarring, and airway narrowing.
1. Prerequisites for Decannulation:
- The primary cause of the tracheostomy should be resolved or improved.
- The upper airway should be open and patent.
- The patient should have a strong cough reflex and be able to manage secretions.
- The patient should have good lung capacity since airway resistance increases by 30% after decannulation.
- The patient must be stable, without fever, infection, or sepsis.
2. Procedure:
- The patient is first tested with a fenestrated tube (a tube with a small opening) or by making an opening at the maximum curve of the tracheostomy tube. This allows the patient to breathe through the upper airway in addition to the tracheostomy.
- The tube is initially partially blocked to check if the patient can tolerate it. If tolerated, the tube is fully blocked during the day and left open at night for the first 24 hours. If the patient can manage a full 24-hour blockage, the tube is then removed.
- If the patient struggles, the tube may need to be downsized or replaced with a fenestrated tube to allow better breathing.
- After removal, an airtight dressing is applied to cover the opening.
- Healing typically occurs within a week, but in rare cases, the wound may need surgical closure.
- Patients who have had a tracheostomy for a long time may develop anxiety about breathing without the tube. These cases require a gradual and carefully managed decannulation process.
———— End of the chapter ————
High-Yield Points for NEET PG and University Exams
- The ideal level for tracheostomy is between the second and fourth tracheal rings, after retracting or dividing the thyroid isthmus.
- Never divide the first tracheal ring because this causes cricoid perichondritis and subglottic stenosis.
- The innominate artery is the most common major vessel involved in tracheo-arterial fistula.
- Apnoea after opening the trachea results from sudden CO2 washout and is treated with 5% CO2 or assisted ventilation.
- The primary advantage of tracheostomy over prolonged intubation is the reduction of laryngeal injury and subglottic stenosis.
- Tracheostomy reduces anatomical dead space by 30 to 50 percent (approximately 50 to 75 mL).
- Cuff deflation should be performed periodically to prevent tracheal necrosis and fistula formation.
- The first tube change occurs at 3 days in adults and 7 days in children.
- Mini tracheostomy (cricothyroidotomy) is an emergency procedure through the cricothyroid membrane and should not be used long-term.
- Percutaneous dilatational tracheostomy is performed at the bedside in the ICU under bronchoscopic guidance.
- The most common cause of late tracheal stenosis is prolonged cuff use with excessive pressure.
- Subcutaneous emphysema after tracheostomy is managed by removing tight dressings and sutures, not by reoperation.
- Decannulation should only be attempted when the upper airway is patent and the patient has an effective cough.
- Speaking valves and fenestrated tubes allow phonation by redirecting air through the larynx.
- Patients with tracheostomy cannot perform the Valsalva manoeuvre and therefore cannot lift heavy weights or swim.
NEET PG Style MCQ’s
- 1: A patient develops sudden massive haemorrhage from the tracheostomy site on postoperative day 10. The most likely source of bleeding is: A. Anterior jugular vein B. Innominate artery C. Thyroid isthmus D. Superior thyroid artery.
- 2: A 60-year-old patient with prolonged respiratory obstruction undergoes emergency tracheostomy. Immediately after opening the trachea, the patient stops breathing. The most appropriate next step is: A. Administer naloxone B. Administer 5% CO2 in oxygen C. Perform chest compressions D. Increase the tracheostomy tube size.
- 3: Which tracheal ring should never be divided during tracheostomy? A. First B. Second C. Third D. Fourth.
- 4: The ideal level for elective tracheostomy in an adult is between which tracheal rings? A. First and second B. Second and fourth C. Fourth and sixth D. Sixth and eighth.
- 5: A patient with a cuffed tracheostomy tube develops coughing whenever he swallows saliva. The most likely diagnosis is: A. Laryngeal stenosis B. Tracheo-oesophageal fistula C. Recurrent laryngeal nerve injury D. Subcutaneous emphysema.
- 6: The primary advantage of percutaneous dilatational tracheostomy over open tracheostomy is: A. Lower risk of bleeding B. Can be performed at the bedside C. Shorter operative time D. Lower risk of infection.
- 7: A patient on prolonged mechanical ventilation via tracheostomy develops progressive difficulty in breathing over several weeks after decannulation. The most likely cause is: A. Recurrent laryngeal nerve injury B. Tracheal stenosis C. Vocal cord paralysis D. Subglottic oedema.
- 8: Which statement about mini tracheostomy (cricothyroidotomy) is correct? A. It is the preferred method for prolonged ventilation B. It is performed through the second and third tracheal rings C. It is an emergency procedure with a risk of subglottic stenosis D. It requires general anaesthesia.
- 9: A patient with tracheostomy develops swelling of the neck and upper chest extending to the lower eyelids. Air is palpably crepitant on examination. The most appropriate management is: A. Emergency re-exploration B. Remove tight dressings and observe C. Needle decompression D. Broad-spectrum antibiotics.
- 10: Decannulation should not be attempted unless which of the following is confirmed? A. The patient has a cuffed tube B. The upper airway is patent C. The patient can speak D. The stoma has healed completely.
Answers: 1-B, 2-B, 3-A, 4-B, 5-B, 6-B, 7-B, 8-C, 9-B, 10-B
Clinical Case Scenarios for Practical Exams and Viva
Case 1. A 65-year-old male smoker presents with progressive hoarseness, stridor, and difficulty breathing over the past 3 months. On examination, you note a fixed right vocal cord and a large ulcerative lesion involving the right true vocal cord. The patient’s oxygen saturation is 88% on room air, and he is using accessory muscles to breathe. Most likely diagnosis: Advanced laryngeal carcinoma with airway obstruction. Best next step: Emergency tracheostomy or, if possible, awake fibreoptic intubation followed by tracheostomy. Definitive management: Laryngectomy after staging.
Case 2. A 45-year-old male presents to the emergency department with severe respiratory distress after being stung by a bee 30 minutes ago. He has facial swelling, stridor, and cannot speak in full sentences. His oxygen saturation is 85%. He has no IV access and cannot lie flat. Most likely diagnosis: Anaphylaxis with laryngeal oedema. Best immediate management: Intramuscular adrenaline (epinephrine) 0.3 to 0.5 mg, high-flow oxygen, and prepare for emergency cricothyroidotomy if intubation fails. Next step if intubation is impossible: Mini tracheostomy through the cricothyroid membrane.
Case 3. A 70-year-old woman with myasthenia gravis has been on a ventilator via endotracheal tube for 14 days. The ICU team requests your opinion about tracheostomy. The patient has a weak cough, copious secretions, and has failed two extubation attempts. Most likely diagnosis: Prolonged ventilatory failure requiring tracheostomy. Best next step: Elective open or percutaneous dilatational tracheostomy to facilitate weaning and secretion management. Important consideration: Early tracheostomy (within 7 to 10 days) reduces ICU length of stay and ventilator-associated pneumonia.
Case 4. A 25-year-old man involved in a motorcycle accident has a severe head injury and is comatose. He develops recurrent pneumonia despite appropriate antibiotics. The nurse notes that he gurgles and desaturates during feeding through a nasogastric tube. Most likely diagnosis: Silent aspiration due to loss of protective airway reflexes. Best investigation: Videofluoroscopic swallow study or fibreoptic endoscopic evaluation of swallowing (FEES). Best management: Tracheostomy with a cuffed tube to protect the airway, along with gastrostomy for feeding.
Frequently Asked Questions in Viva
- Define tracheostomy and tracheotomy.
- Which tracheal ring should never be cut and why?
- What is the safest level of tracheostomy?
- How do you confirm that you have reached the trachea?
- What is the most dangerous complication after tracheostomy?
- Why is humidification important?
- When do you change the tube for the first time in an adult vs child?
- What are the prerequisites for decannulation?
Practical Viva Tips
- When asked to describe the steps of tracheostomy: Start by positioning the patient, then describe the incision, separation of strap muscles, management of thyroid isthmus, identification of trachea, creation of stoma (emphasise avoiding the first ring), and tube insertion. Mention that you would use a horizontal incision for elective cases and a vertical incision for emergencies.
- If asked about complications: Classify them by timing (immediate, intermediate, late). Examiners love asking about apnoea (CO2 washout), tracheo-innominate fistula (sudden massive bleeding), and subcutaneous emphysema (remove tight dressings).
- For decannulation questions: Always mention the prerequisites first (patent upper airway, effective cough, resolved cause). Then describe the gradual process using fenestrated tubes and partial blocking.
- Common examiner trap: “Can you perform tracheostomy in a patient with bleeding diathesis?” Answer: It is a relative contraindication, but if the patient is dying from airway obstruction, you proceed while correcting the coagulopathy simultaneously.
———— End ————
Download full PDF Link:
Tracheostomy Best Lecture Notes Dr Rahul Bagla ENT Textbook
Reference Textbooks.
- Scott-Brown, Textbook of Otorhinolaryngology-Head and Neck Surgery.
- Cummings, Otolaryngology-Head and Neck Surgery.
- Stell and Maran’s, Textbook of Head and Neck Surgery and Oncology.
- Ballenger’s, Otorhinolaryngology Head And Neck Surgery
- Susan Standring, Gray’s Anatomy.
- Frank H. Netter, Atlas of Human Anatomy.
- B.D. Chaurasiya, Human Anatomy.
- P L Dhingra, Textbook of Diseases of Ear, Nose and Throat.
- Hazarika P, Textbook of Ear Nose Throat And Head Neck Surgery Clinical Practical.
- Mohan Bansal, Textbook of Diseases of Ear, Nose and Throat Head and Neck Surgery.
- Hans Behrbohm, Textbook of Ear, Nose, and Throat Diseases With Head and Neck Surgery.
- Logan Turner, Textbook of Diseases of The Nose, Throat and Ear Head And Neck Surgery.
- Arnold, U. Ganzer, Textbook of Otorhinolaryngology, Head and Neck Surgery.
- Ganong’s Review of Medical Physiology.
- Guyton & Hall Textbook of Medical Physiology.
Author:

Dr. Rahul Bagla
MBBS (MAMC, Delhi) MS ENT (UCMS, Delhi)
Fellow Rhinoplasty & Facial Plastic Surgery.
Renowned Teaching Faculty
Mail: msrahulbagla@gmail.com
India
———– Follow us on social media ————
- Follow our Facebook page: https://www.facebook.com/Dr.Rahul.Bagla.UCMS
- Follow our Instagram page: https://www.instagram.com/dr.rahulbagla/
- Subscribe to our Youtube channel: https://www.youtube.com/@Drrahulbagla
- Please read. Anatomy of External Ear. https://www.entlecture.com/anatomy-of-ear/
- Please read. Anatomy of Temporal Bone. https://www.entlecture.com/anatomy-of-temporal-bone/
- Please read. Stenger’s, Chimani Moos, Teal test. https://www.entlecture.com/special-tuning-fork-tests/
Keywords: Types of tracheostomy, Tracheostomy procedures Open tracheostomy, Percutaneous dilatational tracheostomy, Mini tracheostomy, Temporary vs permanent tracheostomy, Emergency tracheostomy, Elective tracheostomy, High vs low tracheostomy, Tracheostomy techniques, What are the different types of tracheostomy? How is percutaneous tracheostomy performed? When is a mini tracheostomy used, Difference between open and percutaneous tracheostomy, What is a permanent tracheostomy? Tracheostomy for airway obstruction, Tracheostomy for prolonged ventilation, Tracheostomy for respiratory failure, Tracheostomy for head and neck surgery, Tracheostomy for trauma patients, Tracheostomy in ICU patients, Tracheostomy for laryngeal stenosis, Tracheostomy for bilateral vocal cord paralysis, Tracheostomy for chronic lung disease, Tracheostomy for spinal cord injuries, Tracheostomy care for families, Tracheostomy types explained for patients, Tracheostomy options for children, Tracheostomy and rehabilitation, Living with a tracheostomy “Types of Tracheostomy: A Comprehensive Guide to Procedures and Uses” “Open vs Percutaneous Tracheostomy: What’s the Difference?” “Understanding Tracheostomy: Temporary, Permanent, and Emergency Options” “Percutaneous Dilatational Tracheostomy: A Minimally Invasive Approach” “Mini Tracheostomy: When and Why It’s Used” “Tracheostomy Types Explained: From Emergency to Elective Procedures” “High vs Low Tracheostomy: Key Differences and Indications” “Tracheostomy for Prolonged Ventilation: Types and Benefits” “Tracheostomy in ICU Patients: Types, Techniques, and Outcomes” “Living with a Tracheostomy: Types, Care, and Lifestyle Adjustments” “Tracheostomy for Airway Obstruction: Types and Surgical Options” “Tracheostomy for Head and Neck Surgery: Types and Considerations” “Pediatric Tracheostomy: Types, Indications, and Care Tips” “Tracheostomy for Trauma Patients: Types and Emergency Procedures” “Tracheostomy and Rehabilitation: Types, Challenges, and Solutions”
Great writing. That too for free. It is amazing.
A valuable resource for medical students with illustrative diagrams ,making it easy to understand the topic
“Excellent work Dr. Rahul!
I’m an ENT resident at AIIMS Delhi.
Your notes are incredibly clear and well-structured – exactly what busy residents need.
Would love to connect and learn more from your expertise.
Best regards
A very insightful book with complete knowledge of the topics, best to study for proff and we can get all important information at one place that too for free
Simplified language, great digrams, amazing book by Bagla Sir
Well explained sir , much needed resource in these days where no one is encouraging book reading .
Very beneficial for both proff and pg preparation!!
Very informative concisely accurate.
Just go through the content and trust me guys you will came back and thank me for this book recommendation.
Easy to understand concepts, arrangement of the content and headings is good and if to want to excel your exams university exams or even for pg preparation it’s a gr8 source.
Well explained And Elaborated !!
Excellent Work By Dr. Rahul Sir
Excellent literature for understanding the concept of E.N.T.
A very insightful book for students seeking knowledge of ENT.